AMP is a new technology from Google that's designed to make browsing on a mobile feel as responsive as using any other app.
AMP achieves incredibly fast loading of web pages by prioritising content and pre-calculating layouts, giving images more time to load without the pain of changing the page layout once everything has finished loading.
That means visitors are able to start reading your content instantly without having to worry about their screen suddenly skipping back to the top of the page due to the images loading in late.
To find out more about what exactly AMP is then take a look at my article AMP for Drupal 8.
Technical details
To get AMP working on Drupal 8 the first step is to install the AMP module along with the AMP theme.
Once you have installed the module and enabled the theme, you will need to copy the ExAMPle Subtheme to create a new theme and rename it 'amp' or whatever is relevant to you.
The main AMP theme should be used as a base theme which you are extending with the new 'amp' sub theme, the reason for setting it up in this way is that you want to be able to update the main AMP theme at anytime without the complications of having to removing your updates from it.
So its best to keep your updates in a sub theme.
Now before you start any theming work you'll first need to configure the AMP module, your content types and any blocks that use views.
Configure AMP module
Path: /admin/config/content/amp
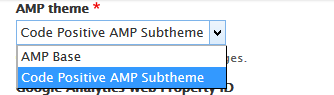
Make sure to select your 'amp' sub theme as your AMP theme.
Your settings should be similar to ours, you may want to change a few but the most important one is the Power User: Run the whole HTML page through the AMP library. This will make sure to convert any images or other html elements that have been attached to a page by CKeditor into the relevant AMP HTML version of that element.

Configure AMP display mode for content types
As I mentioned in AMP for Drupal 8 you can apply AMP to any/all content types, however you may wish to prioritise the content type/s you share most frequently on social media.
To add the AMP display mode to your content types you can either edit the content type directly or do it through the main configuration page (/admin/config/content/amp) under the AMP Status by Content Type settings - simply click enable followed by configure.
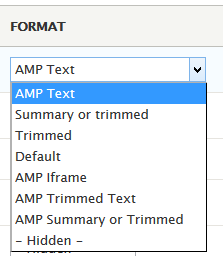
I prefer to edit the content type directly and add the display mode how I would normally, you will then need to prioritise what fields should appear on the AMP display mode. The most important step is to make sure you change the format to the relevant AMP version. The following example is for a text field:
Configure AMP version of view blocks
Now that you have configured your fields correctly you will need to duplicate any Views blocks and again make sure they are using the correct format. I recommend first looking at what content the Views block is adding to the page and deciding if it is relevant for the AMP version of that page.
Once you have done this simply duplicate the View and change the fields to use the relevant format, just as we did for the content types display mode.
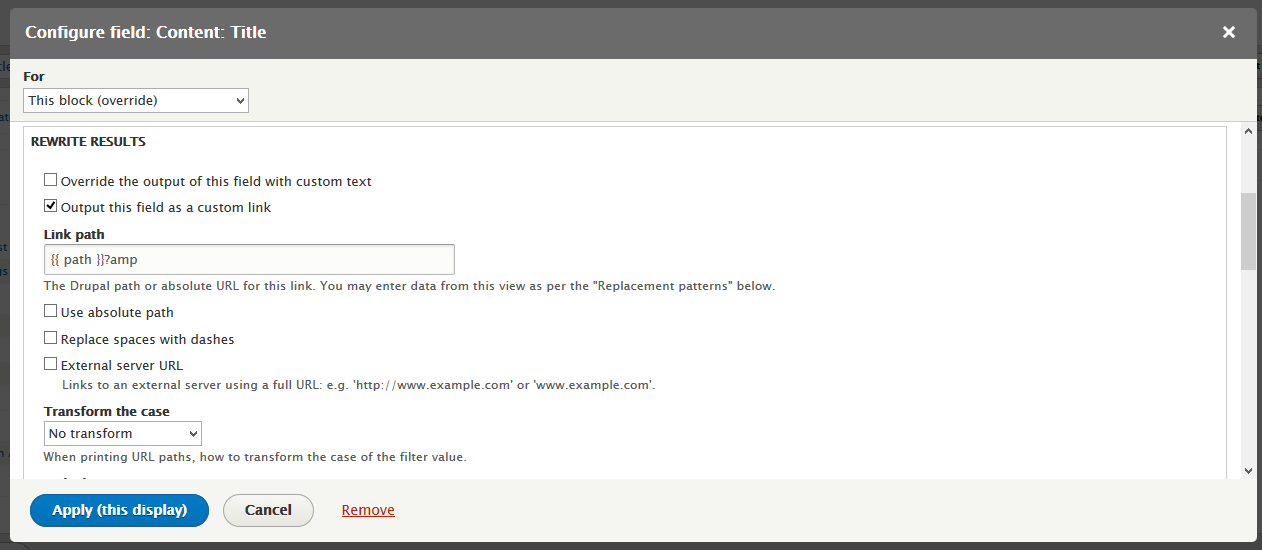
One key thing to remember to do when going through this process is to change the way links are added to the fields in the view. We don't want visitors to be using AMP versions of our pages and to then click a link which will direct them to non-AMP pages on your site. To do this simply add the path as a hidden field on the View so that we can use it as a token when we rewrite results to output the field as a custom link.
At Code Positive we use the query ?amp to convert any of our pages to their AMP version. So we use the path token and simply add the query to the end. This means any links followed will still produce the AMP version.
Configure AMP block layout
Once you have created your new View blocks, you can now add them to the block structure for the 'amp' sub theme. Your path should be /admin/structure/block/list/'amp'. Simply add the blocks and sort the order you wish for them to appear in.
Add your CSS to your sub theme
Now that all your content has been finalised on your AMP pages you can go ahead and style the page.
Configure AMP metadata
Path: /admin/config/content/amp/metadata
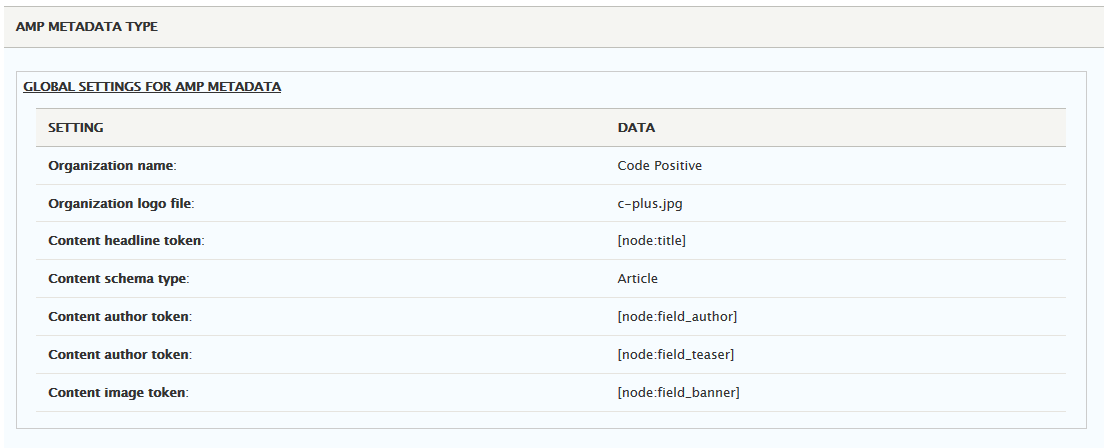
Last step before you go live is to make sure that you add the relevant metadata to your AMP page. Here's ours as a reference:
Testing your AMP configuration:
For testing while you are configuring AMP this development testing tool is what you need to make sure pages validate.
For testing once you have pushed your changes to the production site then this live testing tool lets you check that your pages pass Google's validation and will be added to the Google AMP Cache.
Troubleshooting:
New Relic
The New Relic monitoring service can invalidate AMP pages because it adds it's own JavaScript into pages.
To dissable New Relic on AMP pages add this code to the file /sites/default/settings.php
/** * Customise New Relic. */ if (extension_loaded('newrelic')) {// Add AMP page identifying logic here that would, for example,// set variable $amp to TRUE or FALSE. If $amp is true, disable new relic. $amp = isset($_GET['amp']);if ($amp) { newrelic_disable_autorum (FALSE); newrelic_ignore_transaction(); } }
Inline Images
In order to get Power User: Run the whole HTML page through the AMP library to work you may need to do the following steps:
Add missing file to Git
Depending on how you added the AMP module you may run into issues with some dependency files not being deployable.
To fix that remove .gitignore files from the Vendor/Saberworm directory and commit this file to Git:
vendor/sabberworm/php-css-parser/lib/Sabberworm/CSS/Settings.php
Correct path to images
If your site is hosted on Pantheon you may need to adjust the path to files.
Add this code to sites/default/settings.php
$_SERVER['SERVER_NAME'] = $_SERVER['HTTP_HOST'];
unset($_SERVER['SERVER_PORT']);
Google Analytics
The order in which Javascript is added to AMP pages is important.
Copy:
themes/amptheme/templates/layout/html.html.twig
To:
themes/amp/templates/layout/html.html.twig (assuming 'amp' is name of the AMP subtheme)
In the html.html.twig file you just copied remove this line:
<script async src="https://cdn.ampproject.org/v0.js"></script>
If you're having trouble or would like some help getting started contact us and we'd be happy to help.